How to Make Concrete Art with a Rubber Mat
This is my guide to creating concrete art with a rubber mat. If you can’t see the video please click here.
The best policy
I’ll be completely honest and say that there are some projects I wished I’d never started. I’d say there are many projects my family wishes I’d never started.
This is one of them!
 I’d seen how you could make decorative paving stones using a frame, concrete and a rubber door mat.
I felt it looked too awesome to be trodden on though.
Instead I wanted it to have pride of place on my wall.
Here follows my sorry tale of the piece of art which nearly provoked me to chop off my own ear…
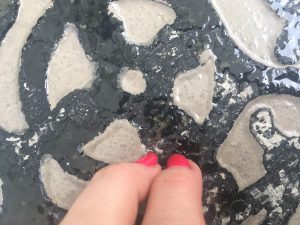
OK so it wasn’t quite that dramatic but I did get a really bad blood blister from making it. No picture evidence here, so you will have to take my word for it.
Facebook live on the edge
 Seeing as I did this one as a Facebook live demo, if you were watching I’m hoping you feel part of this journey.
I got the feeling it was a little like watching car crash TV as I got out the hammer…with only minor injuries. We are back to the blood blister!
If you want to watch it live click here for part one and here’s part two.
The first attempt ended up cracking and falling apart as I made it too thin. Heart breaking.
So here is my guide, or at least a list of do’s and don’ts, for making concrete art.
Frame your art before you start
Making the frame is relatively easy, you just need to make sure the measurements are very precise, but that’s the same with most carpentry right?
You need a base and four sides, the size of which are dependent on the mat and how much of a border you want.
You need to be able to take this apart so it should only be screwed no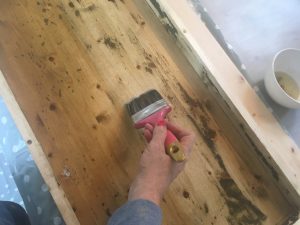 t glued.
If you want to risk it you could drill holes in the concrete at the end, but it’s better to make two batons at the top which can be pulled through (so not fixed).
These will obviously create two holes in the top of the art to then thread cord through for hanging.
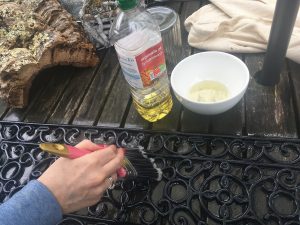
Oil it up
You brush cooking oil over the frame. I suggest organic extra virgin olive oil if you’re the type to shop at Waitrose. Sunflower oil will do if you frequent Lidl.
Make sure this is covering every part of the frame, including the batons.
 Taking into account the thickness of the mat and the frame size, you want to make sure you have the correct amount of concrete to pour in. This may sound obvious, but I had just guessed and got it wrong….in front of a live audience…
Art can’t be rushed dahling
The first time I did this I used quick drying concrete, but it didn’t work out very well as it was drying as I was working with it.
On the second attempt, with Doug the builder’s advice, I used deep base levelling compound from Travis Perkins and this worked a treat.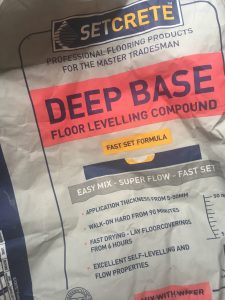
Tap the edges with a hammer to prevent too many air bubbles. Although I like a bit of the bubble look, but you don’t want it to be weakened.
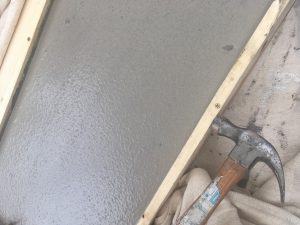 Wait for the concrete to become doughy before adding the mat to the top.
Bear in mind the frame may need babysitting at the start as it’s likely to run out a little at the sides – not one to be done on your mum’s best dining table!
 Brush plenty of oil onto the mat to make sure all parts of the pattern are covered.
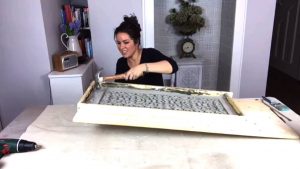
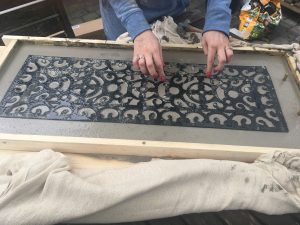 Press the mat down so the concrete fills the gaps of the pattern.
You want the flat, underside of the mat facing upwards.
And wait…
Leave for a couple of days on a level surface.
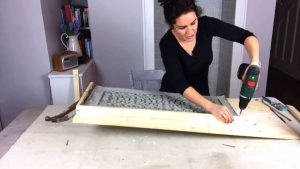
Once completely dry remove the mat and the frame.
Carefully prise out the batons and it’s ready to paint.
And that’s how you make concrete art with a rubber door mat.
 You could of course leave it the grey of the concrete which is a pretty sweet look in the right room and fashionable right now.
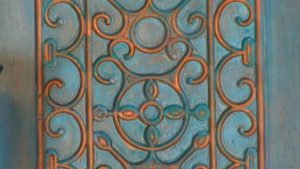
I made the most of the indentation of the pattern by painting it gold and the turquoise of my new lounge colour scheme on the outer section, with a bronze wax on top.
When it catches the light I think it’s really beautiful. I’ve nearly forgotten how much effort it was.
My family have not forgotten.
I say to them that when I’m dead it will be worth a lot of money. If I sit under it after hanging it that time may come sooner than I’d like as it’s pretty heavy!
 Bear in mind if you are going to hang this on your wall it’s heavier than a large mirror so will need the appropriate fastenings.
Talking of mirrors, if you want something else to hang, check out my blog on making plastic ones into chic focal points for any room.
Why not subscribe for free so you never miss a post or video?
For daily posts and live demos come and chat with me on The Home Genie TV Facebook page.