How to make a picture frame
This is my post on how to make a picture frame. If you can’t see the video please click here.
The cost of frame
Have you seen how much it costs to get a picture framed these days? Sometimes it ends up that the artwork itself is worth less than the frame around it!
Also you may be hanging it on old walls or on plasterboard so you don’t want it to be too heavy or substantial.
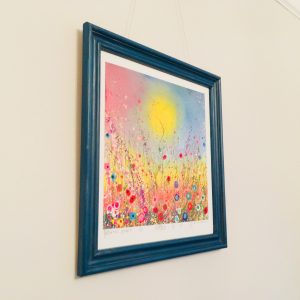
Well, I’m going to show you a quick and simple way to make your own glass-free, lightweight frame like this one.
What you need:
- Length of picture framing moulding, decorative moulding or architrave
- Tape measure and pencil
- Mitre box and tenon saw
- Wood glue, or even better Mitre Mate
- Clamps
- Staple gun and staples
- Cardboard
- Picture hanging wire
- Picture framing tape
- Oh and some artwork!
 If you haven’t got a lot of these items, it may feel like a pricey list. I do think these will all come in handy for numerous projects though – many of which I show you on my blog – so it’s worth investing in them.
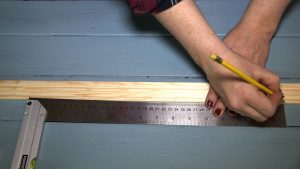
Measure and mark
- Measure what will be the internal length of each side of the frame and mark on your moulding. This needs to be smaller than the margin around the artwork, but obviously large enough that it’s not going to encroach on the picture. The outer edge of the final frame wants to be at least 1.5cm bigger than the outer edge of the margin.
It helps to indicate with a pencil mark which direction the cut will be – you would be amazed how confused I have got by this simple task in the past!
 Remember, the thinner edge of the moulding will be on the inside, so therefore will be shorter than the fatter edge.
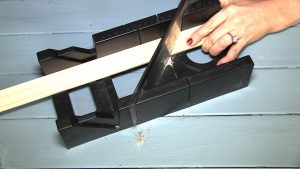
Cut and glue
2. Use a mitre box and tenon saw to cut the four lengths.
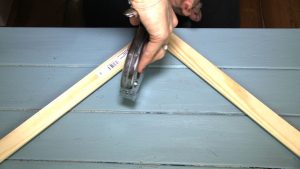
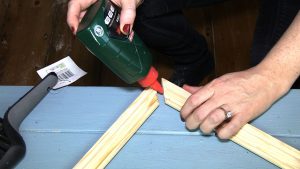 3. Glue the corners together, clamp and wait for the glue to dry.
Since I filmed this, Doug The Builder has introduced me to a product called Mitre Mate. It’s a superglue for wood, so sounds perfect for this project. It may even mean you don’t need the clamps as it dries in 10 seconds. This is not a glue to get on your fingers though!
 Secure and paint
 Secure and paint
4. Once dried, place a staple at each corner just for good measure. Make sure this is near the outside where it’s fatter, as you don’t want the tips of the staple showing at the front.
5. It’s best to paint the front of the frame at this stage.
 6. You can use picture framing tape to cover the staple at each corner, although this is optional.
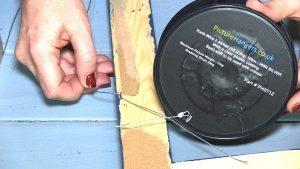
7. On the back, use two staples on what will be the top of the frame to tie some picture hanging wire, or whatever you intend to use.
If you’re going for a more rustic look you might even want to go for twine. Because it’s a lightweight, glass-free frame you should be able to get away with this.
Add the art and hang!
 Add the art and hang!
8. Place the artwork face down on the back of the frame. You could put a little bit of tape on to hold it in place if you want, but that could damage the artwork if you were ever to remove it in the future.
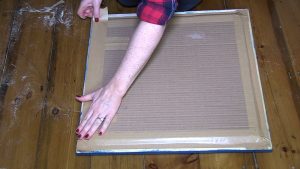
9. Cut some thick cardboard, slightly bigger than the artwork and tape to the back of the frame with the artwork in place on the inside.
 10. Finally, tape over the hanging staples and wire to prevent marking the wall.
And that’s how to make a picture frame!
I know she’s not the most discerning of clients, but even my toddler Bonnie has commented how much she loves this on the wall and she even got quite cross when I took it down for filming!
 A little extra tip is if you know anyone ripping out architrave from an old house, ask if you can have it rather than it going on the skip. This will work perfectly well with a bit of a sand, will save you money and lessen the load to landfill.
The picture I have framed here was a gift from one of my favourite artists Yvonne Coomber. You should see how her stunning artwork transformed my house when she came for the day.
Why not subscribe for free so you never miss a post or video?
For daily posts and live demos come and chat with me on The Home Genie TV Facebook page.
Great video Georgina. As normal first class. You will be after a workshop with machinery next.
Keep up the good work.!!
Thanks Doug – sounds like you’re offering me a job!!!
We will see how you shape up.!
ha thanks!
Start with power saw safety session, if you still have all
of your fingers and nails not scratched at the end of the day you
will pass. Then there will be the nail gun…… You will love that one.. haha
Great video Georgina. As normal first class. You will be after a workshop with machinery next.
Keep up the good work.!!
Thats a great idea Georgina. At the moment, after painting my bedroom in “Georgina grey” I’ve still got my original clip picture frames of my photography from around here. I could make 2 frames and paint them red to match the tie backs and lamp shades. That would give me a red framed picture on the grey wall which would look great!
PS Bonnie is such a star on the piano!
Great ideas Stuart – looking forward to seeing them
That’s a neat way to create a picture frames. And because there’s so many designs on the market (we offer 100!), there’s so much choice.